
Latest Articles
Prefab Container Cabin Floor Plans That Work
Sep
A 20-foot container can become a practical weekend cabin, but only if the floor plan respects the space you actually have. Prefab container cabin floor plans look simple on paper because the footprint is compact and rectangular. The real work is deciding where every door, wall, utility line, window, and storage cabinet belongs before fabrication starts.
For homeowners, landowners, and contractors, the best layout is rarely the one with the most features. It is the one that fits the intended use, the delivery route, the site, and the budget without creating expensive changes later. A cabin used for occasional hunting trips needs a different plan than a backyard guest suite, rental unit, or remote work retreat.
Start With the Real Interior Dimensions
Shipping containers are described by exterior length, but cabin planning happens inside the steel shell. A standard 20-foot container typically provides about 19 feet of interior length, 7 feet 8 inches of interior width, and 7 feet 10 inches of interior height before insulation and wall finishes. A 40-foot container provides roughly twice the usable length, while a high-cube unit adds valuable height for insulation, lighting, and a less confined feel.
That width is the main planning constraint. Once closed-cell spray foam, framing, wallboard, and finishes are installed, the finished interior can be narrower than many buyers expect. A full-width bathroom, galley kitchen, or hallway can quickly consume the room needed for furniture and circulation.
Measure for real items, not just empty rectangles. A standard bed, shower enclosure, refrigerator, sofa, door swing, and mechanical closet all need clearance. If a floor plan only works when every piece is precisely centered and no one can pass through the space, it is not ready for fabrication.
Prefab Container Cabin Floor Plans by Container Size
10-foot cabins: focused single-room space
A 10-foot container cabin works best as a highly focused space: a small office, guard hut, fishing cabin, sleeping bunkhouse, or accessory room. Trying to fit a full kitchen, bathroom, bedroom, and living room into this footprint usually creates a cramped result.
A workable 10-foot plan may use one end for a compact wet bath and utility equipment, with the remaining area serving as a flexible sleeping and seating zone. A Murphy bed or built-in bench can help, but complex furniture adds cost. For a simple overnight cabin, an open layout with exterior cooking or shared bathroom access may be more practical.
20-foot cabins: the efficient studio layout
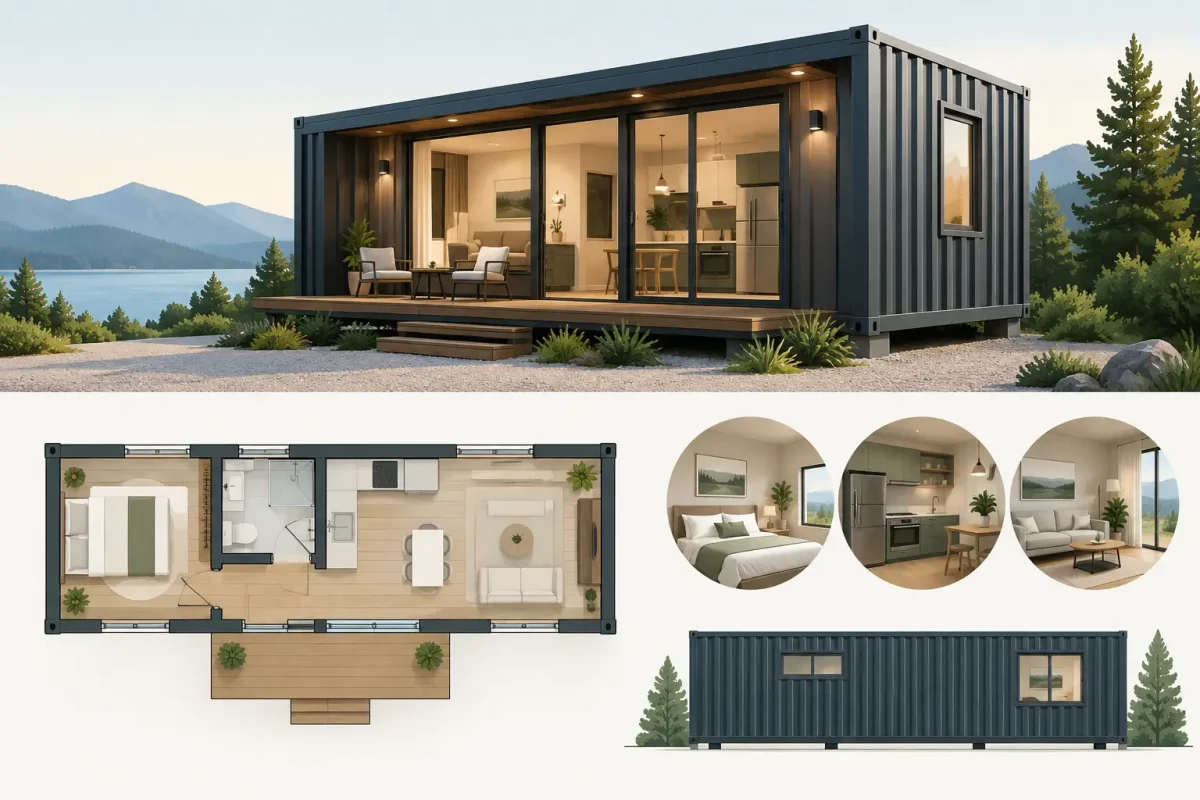
The 20-foot container is often the right starting point for a compact cabin with a studio-style plan. One common arrangement places the bathroom and utility area at one end, a galley kitchen along one long wall, and an open living and sleeping area toward the opposite end.
Keeping plumbing fixtures grouped together controls cost and simplifies installation. A bathroom beside the kitchen lets the water supply, drain, vent, water heater, and electrical equipment stay concentrated in one zone. The other end can use a large window or glazed entry door to bring in daylight and create a stronger connection to the site.
A 20-foot layout can sleep two comfortably when the bed is planned into the room rather than added as an afterthought. It is less suited to a separate private bedroom unless the cabin is intended for one person or uses compact, built-in furniture.
40-foot cabins: room to separate functions
A 40-foot container gives a floor plan more breathing room. It can support a dedicated bedroom, a full bathroom, a kitchen, and a combined living-dining area without forcing every function into the same few feet.
A dependable arrangement places the bathroom and kitchen near the center or at one end, then uses the remaining length for a bedroom and living area. Centralizing the service zone can shorten utility runs, although an end-loaded design may be easier to furnish. The right option depends on window placement, entry location, views, and where sewer, septic, or utility connections will enter the cabin.
For couples, guests, or short-term rentals, a 40-foot high-cube container is often worth considering. The extra interior height improves the feel of the cabin and leaves more room for insulation, ceiling fixtures, and overhead storage.
Multi-container cabins: more options, more planning
Two containers placed side by side, offset, or in an L-shape can create a significantly more livable cabin. The gap between units can become an enclosed living room, entry, breezeway, or covered patio. This approach creates more design flexibility, but it also adds structural, foundation, roofing, transport, and installation considerations.
Removing long sections of container wall requires proper reinforcement. Shipping containers are strong at their corner posts and rails, but large side openings change how loads are carried. A qualified designer or engineer should review modifications, especially in snow, wind, or seismic areas.
Put the Wet Areas First
In compact prefab cabins, the bathroom and kitchen should drive the plan. They are the most expensive rooms to relocate after construction because they involve water, drainage, venting, electrical service, and often mechanical equipment.
A practical bathroom does not need to be large, but it needs usable clearances. Consider how the shower door opens, where towels and toiletries will go, and whether the toilet has enough knee room. Pocket doors can save space, though they require careful wall planning and may limit where plumbing or electrical runs can pass.
For the kitchen, a straight galley along one wall usually works better than an island in a single-container cabin. Choose appliance sizes early. A counter-depth refrigerator, two-burner cooktop, combination microwave, and compact dishwasher may make better use of the room than full-size appliances selected after the cabinets are built.
Design for Light, Privacy, and Furniture
Windows make a steel cabin feel larger, but every opening needs a purpose. Place larger glazing where it captures a view or daylight without compromising privacy. Smaller, higher windows can bring natural light into bathrooms and sleeping areas while preserving wall space for cabinets and beds.
Door placement matters just as much. An entry at the end of a container preserves long side walls for a kitchen, storage, or windows. A side entry may create a better connection to a deck or parking area, but it can interrupt a narrow interior wall that would otherwise support furniture.
Think through the furniture path. In a 20-foot cabin, a queen bed can dominate the layout. In a 40-foot cabin, placing the bedroom at one end often creates a natural privacy zone, but make sure people do not have to walk through the sleeping area to reach the bathroom. Built-in benches, wall-mounted tables, and storage under beds can help, provided they suit how the cabin will actually be used.
Insulation, Mechanical Space, and Local Requirements
A floor plan is not complete until it includes the systems hidden behind the finishes. Containers conduct heat quickly, so insulation choices affect both interior dimensions and comfort. Spray foam can deliver strong performance in a thin profile, while framed interior walls with other insulation systems may take more space. Climate, budget, and local energy requirements all matter.
Reserve space for a mini-split head and condenser connection, electrical panel, water heater, pressure tank if applicable, plumbing access, and ventilation. These items are easy to overlook in a sketch and difficult to hide once the cabin is finished. In cold climates, protect water lines from freezing and avoid placing critical plumbing where it cannot be serviced.
Before finalizing a plan, confirm local zoning, building permits, setback rules, foundation expectations, septic requirements, and whether the cabin will be considered an accessory dwelling unit. A move-in-ready unit can still require site-specific approvals. Delivery access also matters: the site needs enough clearance for the truck, container placement, and any lifting equipment.
Choose the Container Grade for the Job
The starting container affects the finished cabin. One-trip containers are typically the cleanest choice for visible exterior finishes and projects where appearance matters from day one. Cargo-worthy and wind-and-water-tight containers can be a practical value for certain builds, but they may have cosmetic wear, repaired areas, or surface rust that must be addressed during conversion.
For a prefab cabin, insist on clear condition information before you commit. The container should be honestly graded, structurally suitable for modification, and matched to the fabrication plan. A low initial purchase price can disappear quickly if the unit needs extensive floor repair, corrosion treatment, or door-frame work before construction begins.
Mega Containers USA helps buyers match container size, condition, delivery requirements, and intended use so the cabin plan starts with the right steel shell.
The best cabin floor plan does not try to prove how much can fit inside a container. It makes daily use feel simple: a clear entry, a workable bathroom, enough storage, comfortable light, and systems that can be serviced. Start with how the space will be used on an ordinary day, then let that answer shape every foot of the plan.
